BASIC ENHANCEMENTS

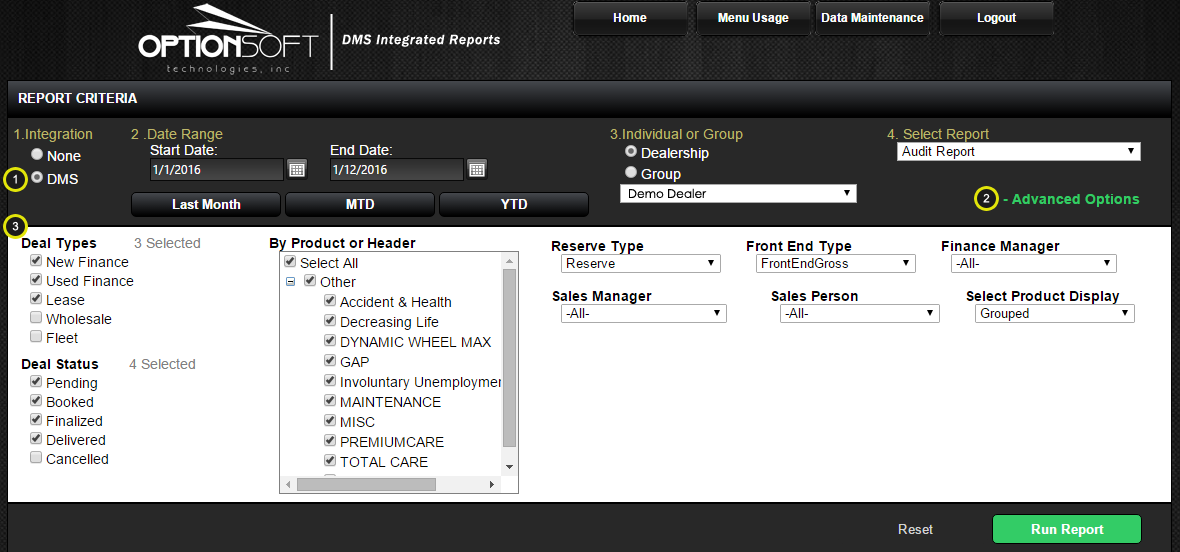
1. Menu Usage
Select Dealership from #4 and click this button to view menu usage logging.
2. Data Maintenance
Click this button to merge products, exclude products, edit deal logs, and manage goals for reports for a specific dealership.
3. Integration Type
Select the type of report you would like to run. Non-DMS and DMS cannot be run together. You may ONLY run reports for dealerships of the same type.
4. Individual or Group Selection
Select to run a report for a selected dealership or a group. If Group is selected, you must check ALL dealerships you wish to include in running your reports
5. Report
Select the Report criteria you wish to run by selecting from the dropdowns.
6. Reset Button
Click to reset criteria to the default state of reports
7. Run Report Button
Click this button to display a report based upon the search criteria selected.
ADVANCED REPORTING W/ ENHANCED DMS INTEGRATION

1. DMS Selection
Select "DMS" under Integration. Report options will refresh to load ALL enhanced DMS reporting options.
2. Advanced Options Button
Click this button to display/hide the advanced options for filtering reports.
3. Advanced Options
Click this button to display more options for reporting. Advanced Options allows you to filter your report by Types, Status, Product, Reserve Type, Front End Type, Finance Manager, Sales Manager, Sales Person, and Product Display
TEMPLATES

1. Save and Run Template
Select "DMS" under Integration. Select 'Date Range', 'Dealership/Group', 'Report Type' and the necessary 'Advanced Options' criteria. Click 'Actions' and then select 'Save Template' from the dropdown menu. This allows you to save report criteria to reuse in the future. To reuse a template, select 'DMS' under integration, set a date range, click the drop down for 'Select Template', select your template and then click 'Run Report'
2. Update Template
Select a Template from the 'Select Template' drop down. Once your template is selected, you may change your report criteria as you wish. When your report criteria has been changed to your satisfaction, click 'Actions' and select 'Update Saved Template' from the drop down menu. An "Update Template" modal will appear to verify your edits. Click 'Update' and your template will be updated to the new criteria.
3. Save a New Template from Existing Template
Have a Template saved for a Finance Manager with extensive criteria and you do not want to recreate it all over again? No problem! Select the template from the 'Select Template' drop down menu. Select and change the criteria you wish to change. Click 'Actions' and select 'Save as New Template'. The "Save Template" modal will appear and allow you to save the template under a new name and keep your existing template.
4. Delete a Template
Select the template from the 'Select Template' drop down menu. Once the template is selected, click 'Actions' and select 'Delete Saved Template'. The "Delete Template" modal will appear to confirm the delete criteria is correct. Click 'Delete" and the template will be removed from your list of templates.
SUBSCRIPTIONS

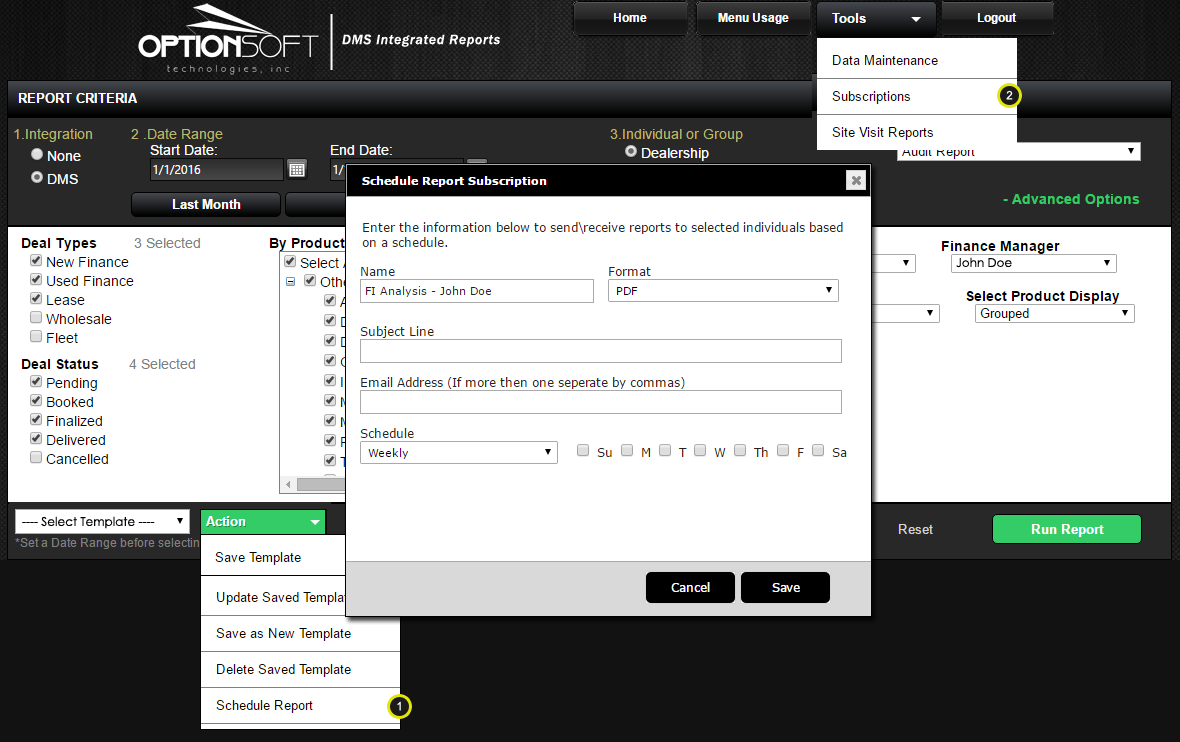
1. Create a Subscription
Select a Template from the 'Select Template' drop down menu. Once the template is selected, click 'Actions' and select 'Schedule Report'. The "Schedule Report Subscription" modal will display. Select the format, enter a subject and email address(es) to send, and select the schedule to receive the reports. When you click Save, your subscription will be saved and the emails entered will receive these reports(by email) based on the schedule set.
2. Edit & Remove Subscriptions
Click 'Tools' from the top header and select 'Subscriptions'. The "Report Subscriptions" modal will appear and allow you to view and edit all saved subscriptions. Under "Actions" you can click the 'Edit' icon to change any criteria set for a subscription. You can click the 'Email' icon to force send a subscription at any point in time. To remove a subscription, click the 'Delete' icon. A "Delete Subscription" modal will appear to confirm the delete criteria is correct. Click 'Delete' and the subscription will be removed from your list of templates.